Most people know that I love colours.....and stuff. Mostly I love coloured stuff. But in particular I love chairs and lights, not too sure why. (I can hear Nicole Selwyn chuckling). I think I just love and appreciate beautiful chairs and beautiful lighting. Perhaps its just because they are two of the most key pieces in any room. The chair is what we are going to be sitting on and the lighting is what creates the mood.
The awful thing is, the lighting in my flat is quite bad; none of the rooms have enough light and I am constantly thinking how I need some fabulous, statement floor lamps to go in my bedroom and the lounge, to add to the already cluttered world of stuff I have.
Therefore, it only seemed appropriate in my thirst for knowledge and learned new skills, that I take it upon myself to make my own piece of lighting. I have seen a couple of different companies that do workshops in lampshade-making, but one in particular caught my eye only very recently.
Space1a Design is an independent design studio in East London that makes a range of homeware and accessories in quirky, contemporary designs and everything is sustainable and locally sourced.
When I spoke to one of the owners, Helen, she told me that I could either bring my own fabric to make the lampshade or I could pick one of their own award-winning, designed fabrics. I perused the website and in no time at all had I spotted another one of my favourite things; pink flamingoes. My love for them began at a very early age after seeing the Disney film, Alice in Wonderland and laughing hysterically when the Queen of Hearts used the pink birds to play croquet with. I think of that film with great affection and fondness. I want to watch it right now.
Anyway, pink flamingo fabric it would certainly be and so one evening last week I made my way to a lonely, industrial street in Walthamstow. I was met by Helen, the co-owner of Space1a and also the hand maker of all of their products. I was secretly very pleased to discover that I was to be the only student in the class. Two people had cancelled last minute and so all the attention would be on me. Yay. I was also very proud to be Helen's first student since it turned out that this was the first of her workshops.
The studio was lovely, light and airy and full of all of their fabrics and products. I particularly liked a chair (!) with some multi-coloured bugs on it. All of their current range of designs are inspired by the natural world and made with children and or childlike qualities in mind. Ah, the pink flamingo link for me; thats nice.
Helen could not have been a better teacher. She spent the first half hour or so telling me and showing me how a lampshade is made. She uses the most traditional technique called the rolled edge format. She made one from scratch for me, totally effortlessly and talking to me at the same time. She told me that she can make one in twelve minutes, which I guess is good to know when she gets orders of around 50 and has to make each of them by hand, all within a few days.
She started off by telling me about the type of fabric you might want to use and that you should be thinking about the light that is going to be reflected through it i.e. how much light depends on the colour and the material and thickness of the fabric. For example, white will reflect the most amount of light and it is best to use a lightweight cotton that is stronger than paper or silk.
Helen took me through each step and within a matter of minutes she had made another quirky lampshade to add to her inventory. It was then my turn to give it a go.
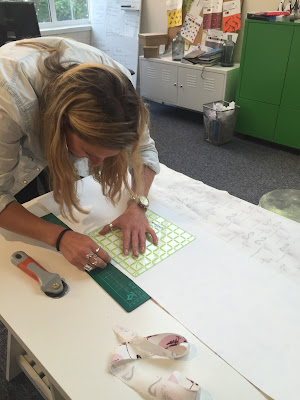
So once my fabric has been cut to size I then needed to fireproof it. The inside of the lamp shade can't just be exposed to a bulb so you have to cover it with a fire proof PVC. This is actually the step that takes the longest because you have to make sure that the positioning is totally exact and that there are no creases or loose fibres once the fabric and the PVC are aligned and cut.
You then use your two lamp rings to create the shade. One thing you have to think about is whether the fabric is directional, i.e. if it has a certain pattern that only goes one way, you need to think about which lampshade ring goes to the top or bottom, depending on whether you are doing a table/floor lamp or a pendant. I didn't want my poor pink flamingoes to be upside down like in Alice in Wonderland so Helen was very careful to make sure I was doing the right thing. I had to wrap some strong double-sided tape around each of the rings before placing them on the fabric panel to roll.
The rolling part is a little tricky as you have to make sure that the rings are totally lined up with the correct edges of the fabric and stay straight. I had to start again a couple of times but I got there in the end. Once that was done I then had to just tuck in my overlapping edges, fold over any surplus little bits and make sure everything was tucked very tightly behind the rings.
Basically that was it! I was really quite amazed at how easy and quick it was to do. Helen was so good at making sure that I did every little step myself. If there was ever something I hadn't done quite right, rather than her just doing it for me she would tell me again what was needed and then I could correct any mistakes. It was simple and easy and fun and I totally did it all myself, all that more satisfying. I not only got to take away my lampshade but I also got a kit to take away with all the instructions, tape, lamp rings and all the essentials for me to make another one at home.
I thought the class was excellent and at £39 for three hours, it was very good value. If you're keen on making a lampshade for yourself or as a present for someone else, definitely get in touch with Helen at
Space1a Design.
I was fast to buy a stand for my shade and the pink flamingoes now have pride of place without the blood rushing to their heads.


2 Comments:
Ooh really beautiful .. and yes (i did chuckle as predicted) xx
Love it! Looking forward to seeing it tomorrow tonight x
Post a Comment